
Greetings...
This is a tutorial on how to backup, encrypt and restore your precious personal data and application to a different location and restoring it when you need it most. We are going work with ADB Terminal Command to be able to complete this task. It pretty easy to grasp and comprehend once it get the feel of it, probably you might even want to explore more of the usage of the command for your Android devices.
Environment:
Microsoft® Windows® 8/7/Vista (32- or 64-bit) and Windows® 10. For upgrade from a previous build of Windows, to Windows® 10, a fresh installation of Android SDK Tools is required.
Requirements:
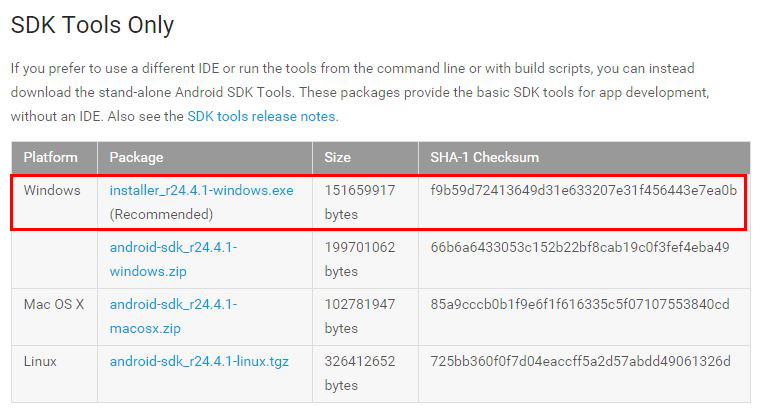
Download and install: Android SDK Tools
Download and install: Java SE Development Kit 32-bit
Download and install: Java SE Development Kit 64-bit (running 64-bit Windows)

Essentials:
USB DATA cable (the one that came with your device)
USB Port on your PC/Laptop
Enable USB Debugging - Goto Settings > Additional settings > Developer options > USB Debugging - Enable (If you have not activated Developer options, then Goto Settings > About phone > tap MIUI version 7 times > You are now a developer)
Installing the Android SDK Tools:

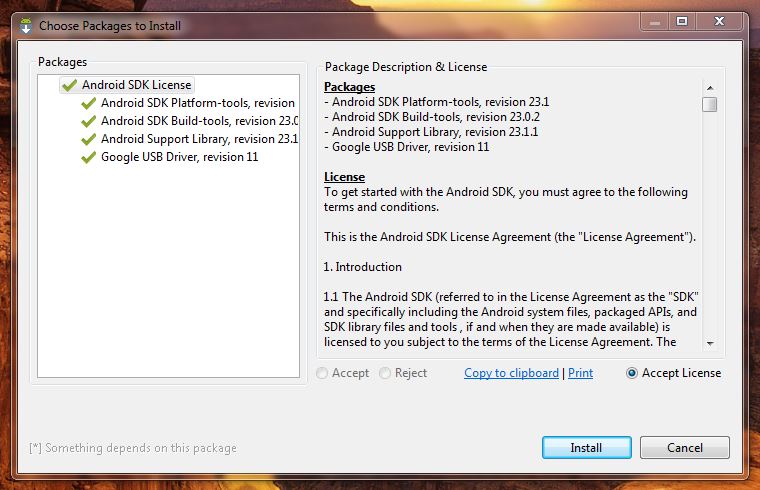
In the SDK Manager Terminal, check the box as shown in the images below:-


Accept License and click Install, to update what you have just ticked, as shown below:-
Backup your Redmi Note 3/Pro:
Note: Replace all the applicable "COMPUTER_NAME" to the actual name of your computer.
Now connect your device to the computer via USB cable. After you done that, we need to locate the ADB.EXE, by copying the code below which is the path, onto your window explorer and press enter, in the following image:-
C:\Users\COMPUTER_NAME\AppData\Local\Android\android-sdk\platform-tools

Once you are at platform-tools folder, hold Shift on your keyboard and right-click your mouse inside it, and select Open command window here, as shown below:-

Now key the ADB command in the Terminal Window, as follows:-
To check the ADB version:-
adb version
adb devices
adb backup -apk -shared -all -f C:\Users\COMPUTER_NAME\backup.ab

After running this command, you will have to agree to the backup on your device. Should you want to encrpyt, enter a password to encrypt the backup, as shown below:-

After done that, the process might take some time depending on the size of your backup.
To see where your backup is, just use this path C:\Users\COMPUTER_NAME, as shown below:-

Restore your Redmi Note 3/Pro:
To restore your backup, at anytime you need enter the following command:-
adb restore C:\Users\COMPUTER_NAME\backup.ab
As shown below:-

You will then be asked to do a full restore, this will replace the data and apps on the device with the ones from your backup. If you encrypted the backup with a password, you will need to enter the password to restore it, as shown below:-

Now you should be where you were before. It is always advisable to frequently backup, which will give a restoration point to return to, after some crashes or a bricked.
DRIVER SOURCE:
DISCLAIMER: Always perform a NANDROID Backup before you endeavor into flashing or updating your ROM. Flashing can potentially cause a brick or a bootloop. DO IT ON YOUR OWN RISK.
“Solving with Simplicity"
No comments:
Post a Comment